
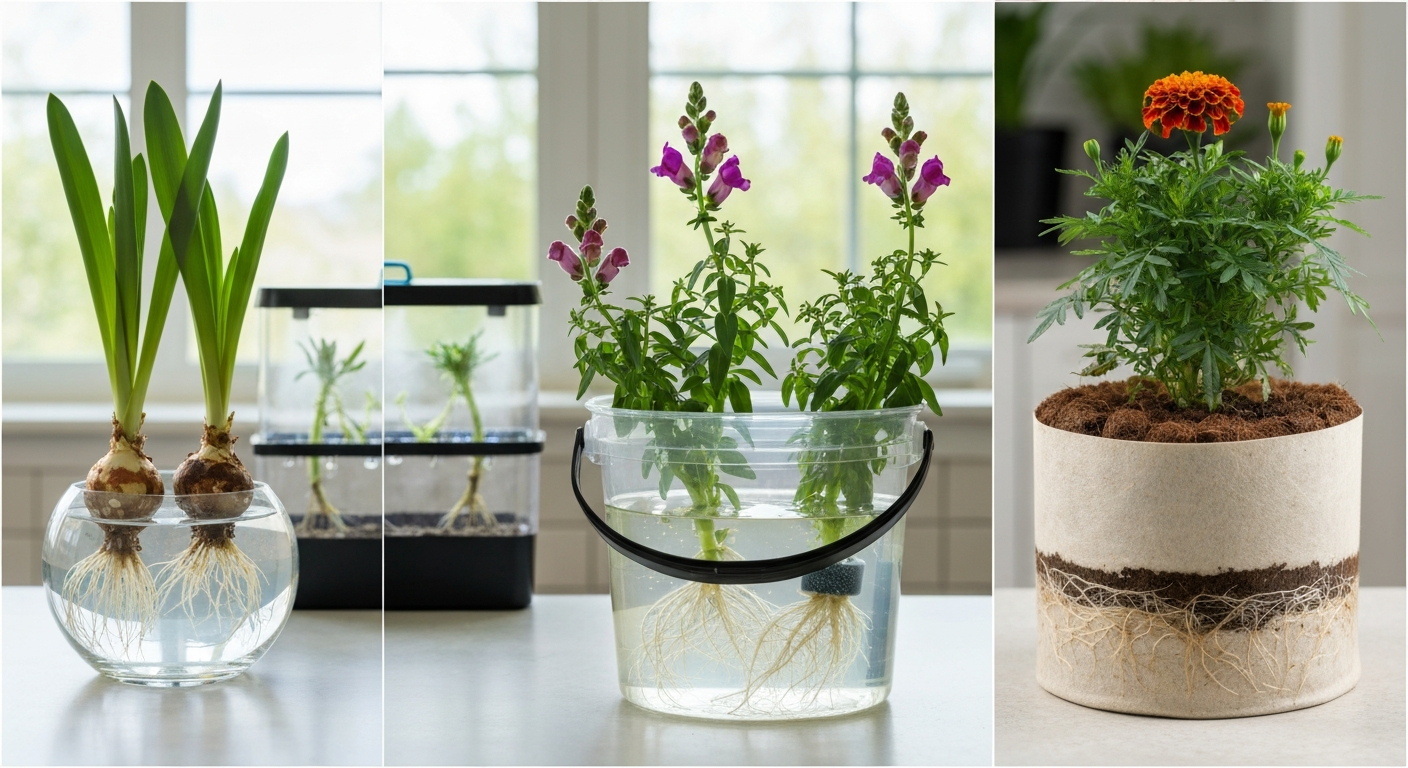
You can grow real, blooming ornamental flowers without a single speck of soil by suspending their roots in nutrient-rich water, misting them with aeroponic systems, planting them in inert media like coco coir, perlite, or rockwool, or even forcing bulbs over pebbles in a glass jar. It works for marigolds, snapdragons, and cutting-garden favorites just as reliably as it does for the leafy vegetables most people associate with hydroponics. The tricky part is choosing the right method for your space and budget, then getting your nutrient solution's pH and EC dialed in. Once you do that, flowers grown without soil often outpace their garden-bed counterparts, producing blooms faster and with fewer pest headaches.
How to Grow Flowers Without Soil: Practical Soilless Guide

James Holloway
29 Jul 2026
Why grow flowers without soil (and is this guide for you?)
I started experimenting with soilless flower growing out of frustration with my heavy clay backyard. Every spring I'd watch snapdragon seedlings sulk in waterlogged beds, and marigolds would come up patchy no matter how much I amended the ground. Moving plants into a simple deep water culture bucket indoors changed everything. The first batch of snapdragons I grew in a DWC bucket under LED lights bloomed six weeks from transplant, which was faster than anything I'd managed outside.
This guide is written for beginner and intermediate home gardeners who want to grow ornamental flowers in a limited space, year-round, or simply without the hassle of managing outdoor soil conditions. If you're dealing with poor native soil, a balcony, a basement grow room, or just curiosity about hydroponics, soilless methods give you full control over what your plants eat, how much light they get, and when they bloom. You don't need a greenhouse or engineering experience. You need a container, some basic nutrients, and a willingness to learn by doing.
What 'without soil' actually covers
People use 'soilless' loosely, so let me break down exactly what falls under this umbrella before we go further.
True hydroponics
In a true hydroponic system, roots sit in or are regularly fed with a liquid nutrient solution and no organic growing medium is used. The major system types are deep water culture (DWC), nutrient film technique (NFT), ebb-and-flow (also called flood-and-drain), drip/media systems, and water culture raft systems. Each delivers nutrients differently, but the principle is the same: the plant gets everything it needs dissolved in water.
Aeroponics
In an aeroponic system, roots hang suspended in an enclosed chamber and are periodically sprayed with a fine nutrient mist. Because roots are exposed to air between misting cycles, oxygen uptake is maximized. This makes aeroponics excellent for fast propagation, and aeroponic cloners are genuinely one of the best tools I've found for rooting cuttings. Soft-stem cuttings typically root in 5 to 14 days at 72 to 77°F (22 to 25°C) with humidity around 65 to 85 percent.
Aquaponics
Aquaponics integrates fish and plants in a recirculating system. Fish waste provides ammonia, which beneficial bacteria convert to nitrates that feed plants. The plants filter the water, which cycles back to the fish. It's a beautiful closed loop, but it adds complexity (fish care, biofilter management, ammonia spikes) that makes it more demanding for beginners than a simple hydroponic setup. For ornamental flowers specifically, the fish-waste nutrient profile may need supplementing since flowering plants have different macronutrient demands than leafy greens.
Inert media
Coco coir, perlite, rockwool, and expanded clay (hydroton) are called inert media because they hold no nutrients of their own. They anchor roots and retain moisture, but you control all nutrition through the nutrient solution you water with. Pots filled with coco or perlite look almost identical to conventional container gardening but function like hydroponics. This is often the easiest entry point for beginners because the watering rhythm feels familiar.
Water-only forcing (bulbs and tubers)
Paperwhite narcissus and some hyacinths will root and bloom when suspended over water on pebbles or in a purpose-built forcing vase, with the water level held just below the bulb base. Hardy spring bulbs usually need a chilling period first, with species-specific durations you can find in extension forcing guides. For species-specific chilling durations and methods, see Forcing Bulbs for Indoor Bloom, University of Missouri Extension (G6550) Forcing Bulbs for Indoor Bloom — University of Missouri Extension (G6550). This is the simplest possible introduction to soilless growing and requires no equipment beyond a container and some gravel.
Quick decision guide: which soilless method fits you?
Before buying anything, answer three questions: How much space do I have? What's my budget? And how much time do I want to spend on maintenance? Your answers will point you toward the right system immediately.
| If you... | Choose this method | Why it fits |
|---|---|---|
| Have a windowsill or small shelf, budget under $30, total beginner | Bulb forcing in water / inert media pot | No pump, no nutrient mixing until ready |
| Have a 2×2 ft space, budget $50–$100, beginner | DWC bucket (5-gallon) | Simple, low-maintenance, very forgiving |
| Have a 4×4 ft area, budget $100–$250, intermediate | Ebb-and-flow tray system | Handles multiple plants, easy to expand |
| Have a 4×4 ft area, budget $150–$300, intermediate | Coco/perlite media pots with drip or hand-watering | Familiar feel, excellent for heavy bloomers |
| Have a grow tent or spare room, budget $250+, advanced | NFT channel or aeroponic system | Faster growth, high oxygen to roots |
| Have space for a fish tank plus grow bed, budget $300+, patient learner | Aquaponics | Self-sustaining once established, lower ongoing cost |
If you're completely new to this, I'd genuinely recommend starting with either a single DWC bucket or a couple of coco coir pots before committing to a larger system. The learning curve around pH and EC is real, and a small setup limits the damage if something goes wrong.
Soilless vs soil: an honest comparison
Soilless systems aren't universally better than soil. They're better in specific situations. If you already have a well-amended raised bed producing beautiful cutting flowers, there's no reason to switch. But if your outdoor conditions are challenging, say clay soil that drains poorly, compacted ground, or no outdoor space at all, soilless methods remove those constraints entirely. It's also worth noting that the question of how much soil flowers actually need to thrive is one worth exploring if you're on the fence about going fully soilless.
| Factor | Soilless (hydroponics / inert media) | Raised bed (amended soil) | Compost-rich bed | Clay soil (outdoors) |
|---|---|---|---|---|
| Startup cost | Medium–high ($50–$300+) | Low–medium ($20–$150) | Low ($10–$80) | Low (free if already present) |
| Ongoing time | Daily checks (pH/EC/water level) | Weekly watering + occasional feeding | Low once established | High (drainage, amendment work) |
| Growth speed | Faster (30–50% in ideal setups) | Moderate | Moderate–fast | Slow, highly variable |
| Pest pressure | Reduced (no soil-borne pests) | Moderate | Moderate | Can be high |
| Drought/waterlogging risk | Controllable | Low in raised beds | Low–moderate | High waterlogging risk |
| Nutrient control | Precise | Moderate (soil buffers) | Moderate | Low |
| Year-round growing | Yes (indoors) | Seasonal | Seasonal | Seasonal |
| Beginner friendliness | Moderate (pH/EC learning curve) | High | High | Low (drainage problems common) |
The clearest win for soilless is year-round indoor production and speed. The clearest win for a good raised bed is simplicity and lower initial investment. Compost-rich beds are outstanding for summer annuals like marigolds and wildflowers that want rich, fast-draining soil. For practical tips on using compost-rich beds, see can you grow flowers in compost. Clay soil is the hardest to work with in any scenario.
Every soilless system explained
Deep water culture (DWC)
Plant roots hang down through net pots into a reservoir of aerated nutrient solution. An air pump and air stone keep dissolved oxygen levels high. This is the most beginner-friendly active hydroponic system. A single 5-gallon bucket with one air stone can support two to three marigold or snapdragon plants. Reservoir temperature should stay below 72°F (22°C) to prevent root rot and oxygen depletion. Change the nutrient solution completely every 7 to 14 days and top off with plain pH-adjusted water in between.
Ebb-and-flow (flood-and-drain)
A tray of plants is periodically flooded with nutrient solution from a reservoir below, then drained by gravity. A timer controls the pump. This system scales well and suits a bench full of pots in coco or clay pebbles. Flood frequency depends on media and plant size, typically two to four times daily for mature plants in a warm environment. I've grown cutting-garden dahlias very successfully in an ebb-and-flow tray at the busiest part of the season.
Nutrient film technique (NFT)
A thin, continuous film of nutrient solution flows through angled channels past bare roots. NFT is very water-efficient and great for smaller, lighter plants. Snapdragons and smaller cutting flowers work well. The downside is that any pump failure immediately stresses plants since there's almost no buffer volume of solution around the roots. Not my top pick for beginners, but efficient for anyone with a bit of system experience.
Aeroponics
High-pressure misters spray roots suspended in a dark chamber every few minutes. Aeroponics delivers the fastest vegetative growth of any method because of extreme oxygenation. Equipment cost is higher and mister nozzles clog if nutrient solution isn't filtered and cleaned regularly. Where aeroponics genuinely shines is in an aeroponic cloner for rooting cuttings before transplanting into another system.
Aquaponics
Fish (commonly tilapia, goldfish, or koi for small hobby systems) produce waste that bacteria convert to plant-available nitrate. Ornamental flowers grown in aquaponic media beds do well once the system is mature (usually 4 to 6 weeks for the nitrogen cycle to establish). The main challenge for flowering plants is that the natural nutrient profile from fish waste is heavier in nitrogen and lighter in phosphorus and potassium, which are critical for bloom. Many aquaponic flower growers supplement with approved bloom-phase nutrients during flowering.
Container water culture
This is essentially a simplified DWC without a separate reservoir. Plants sit in net pots over a single container of nutrient solution, with an air stone for oxygenation. It's perfect for bulb forcing as well as rooted seedlings. Paperwhite narcissus, hyacinths, and even tulips (after chilling) bloom beautifully this way. Think of it as the gateway drug to hydroponics: cheap, immediately rewarding, and a great teacher.
Inert media pots (coco coir, perlite, rockwool)
Potting a flower into coco coir or a 50/50 perlite and coco blend and watering with nutrient solution is functionally identical to hydroponics despite looking like container gardening. Coco is slightly forgiving because it buffers moisture, while pure perlite drains so fast that hand-watering twice daily is needed at peak growth. Rockwool blocks are ideal for seed starting and early transplants because they're sterile, easy to handle, and integrate directly into DWC or NFT systems. Pre-soak rockwool in pH 5.5 water for at least an hour before seeding.
System setup checklists
DWC bucket setup
- 5-gallon opaque bucket with lid (one per 2–3 plants): $5–$10
- Net pots (2-inch or 3-inch, quantity matches lid holes): $5 for 10-pack
- Air pump rated for the reservoir volume: $10–$20
- Air stone and airline tubing: $5–$8
- pH meter or digital pen: $15–$30
- EC/TDS meter: $10–$20
- pH Up and pH Down solutions: $10–$15 for both
- 2-part or 3-part hydroponic nutrient concentrate (e.g., General Hydroponics Flora Series): $20–$35
- Rockwool cubes or coco pucks for seed starting: $5–$10
- Growing medium for net pots (expanded clay / hydroton): $10–$15 for 10L
- Estimated total startup cost: $95–$170
Ebb-and-flow tray setup
- Flood tray (2×4 ft is common) with drain fittings: $30–$60
- Reservoir (10–20 gallon tote): $10–$20
- Submersible pump (rated for reservoir volume with head height): $15–$30
- Digital timer (15-minute intervals minimum): $10–$15
- Overflow fitting and tubing: included with most tray kits or $5–$10
- 4-inch net pots or small individual containers filled with coco/clay pebbles: $10–$20
- pH meter, EC meter, pH Up/Down: $35–$65 (same as DWC)
- Nutrient concentrate: $20–$35
- Estimated total startup cost: $135–$265
Inert media pot setup (coco coir)
- 1-gallon to 3-gallon fabric or plastic pots (one per plant): $1–$3 each
- Coco coir brick or bag (expands to fill pots): $10–$20 for 5kg
- Perlite (mix 30% perlite into coco): $8–$12 for 8L
- Watering can or hand pump sprayer for nutrient solution delivery: $5–$15
- Saucers to catch runoff (measure runoff EC to gauge salt buildup): $1–$3 each
- pH meter, EC meter, pH Up/Down: $35–$65
- Nutrient concentrate: $20–$35
- Estimated total startup cost: $80–$170 for 6–8 plants
Aeroponic cloner setup (propagation)
- Aeroponic cloner unit (16–24 site commercial unit): $40–$90
- Cloning gel or powder (IBA-based, 1,000–3,000 ppm for harder-to-root stems): $8–$15
- Cloning collars (usually included with unit): included
- pH meter and small bottle of pH Down: $20–$35
- Dilute cloning nutrient (optional, very low EC ~0.4–0.6): $10–$20
- Humidity dome or plastic sheeting if room humidity is below 60%: $5–$10
- Estimated total startup cost: $83–$170
Printable materials checklist (universal to all systems)
- pH pen or meter — 1 unit, calibrate before first use and monthly after
- EC/TDS pen or meter — 1 unit
- pH calibration solution (4.0 and 7.0 sachets) — 1 pack each
- pH Up (potassium hydroxide or potassium silicate solution) — 1 x 250ml bottle
- pH Down (phosphoric acid solution) — 1 x 250ml bottle
- Nutrient Part A (nitrogen/calcium) — 1 x 1L bottle
- Nutrient Part B (phosphorus/potassium/magnesium) — 1 x 1L bottle
- Measuring syringes (1ml and 10ml) — 2 units each
- Dedicated mixing container (1 gallon jug) — 1 unit
- Disposable gloves — 1 box (pH Down and Part A are irritants)
- Permanent marker and labels (for reservoir change dates and EC targets) — 1 set
- Thermometer for reservoir or room — 1 unit
- Timer for pump or lights — 1 unit per application
- Notebook or phone app for daily logs (pH, EC, top-off volumes) — 1
Getting plants into the system: seeds, cuttings, and bulbs
Starting from seed in inert media
- Pre-soak rockwool cubes or coco pucks in water pH-adjusted to 5.5 for one hour, then drain gently (don't squeeze).
- Place one to two seeds per cube at the depth specified on the seed packet. Most ornamental flower seeds go in at a depth of 2–3 times their diameter.
- Keep cubes in a humidity dome at the species' recommended germination temperature. Snapdragons and marigolds germinate well at 65–72°F (18–22°C). Poppies prefer cooler 55–65°F (13–18°C).
- Mist lightly with plain pH 5.8–6.0 water (no nutrients yet) to keep media moist but not saturated.
- Once cotyledons (seed leaves) are fully open, begin feeding with quarter-strength nutrient solution at EC 0.4–0.6 mS/cm.
- Transplant seedlings into your chosen system when roots are visible emerging from the cube bottom (usually 10–21 days from germination depending on species).
Propagating from cuttings (the non-seed route)
If you want to skip seeds entirely and clone a plant you already love, cuttings are the answer. This is particularly useful for snapdragons, dahlias (tip cuttings), and marigolds. Take a cutting 3 to 5 inches long just below a leaf node, strip lower leaves leaving two to three pairs at the top, and apply IBA-based rooting gel or powder to the cut end. Place the cutting in a rockwool cube, aeroponic cloner, or a cup of moistened perlite under a humidity dome. Roots typically emerge in 7 to 21 days depending on species and temperature.
Forcing bulbs without soil
- For paperwhites: fill a shallow bowl with clean gravel or pebbles, place bulbs with pointed ends up, and add water until it just touches the bulb base. Roots will descend into the water. No chilling required.
- For hyacinths: use a forcing vase shaped to hold the bulb just above water. After chilling the bulb at 35–48°F (2–9°C) for 10–14 weeks, bring it into a bright room at 60–65°F (15–18°C) and blooms appear in 3–4 weeks.
- For tulips and other hardy spring bulbs: follow species-specific chilling duration guidelines from extension forcing resources, typically 12–16 weeks at 35–48°F, then force in water-over-gravel containers as above.
Nutrients, pH, and EC: the numbers that matter
This is where most beginners stumble, so I want to make it as concrete as possible. Two numbers govern soilless growing: pH (how acidic or alkaline your solution is) and EC (electrical conductivity, which measures how much dissolved fertilizer is in the water).
For most ornamental flowers in a soilless system, maintain pH between 5.5 and 6.5. A working range of 5.8 to 6.2 suits seedlings through early vegetative growth, and you can allow it to drift up toward 6.2 to 6.5 as plants approach flowering to improve phosphorus and calcium uptake. Test pH every day during the first few weeks until you understand how quickly your system drifts.
EC targets change with growth stage. Start low and ramp up gradually. Municipal tap water often has a base EC below 0.5 mS/cm, which is a good starting point. Always test your source water before mixing nutrients because high base EC or alkalinity changes your fertilizer dosing.
| Growth Stage | EC Target (mS/cm) | pH Range | Notes |
|---|---|---|---|
| Germination / seed soaking | 0.0 (plain water) | 5.5–5.8 | Nutrients before roots are present cause salt stress |
| Seedling (cotyledons to 2nd true leaf) | 0.4–0.8 | 5.8–6.0 | Quarter to half-strength solution |
| Vegetative growth | 1.0–1.6 | 5.8–6.2 | Full-strength vegetative formula |
| Pre-flower / budding | 1.4–2.0 | 6.0–6.5 | Transition to bloom formula (lower N, higher P and K) |
| Full flowering / cutting stage | 1.6–2.5 | 6.0–6.5 | Maintain; flush with plain water every 2–3 weeks to prevent salt buildup |
Commercially available 2-part and 3-part nutrient concentrates (like the General Hydroponics Flora Series, which provides stage-by-stage mix rates) are a practical starting point. Follow the manufacturer's feed chart for the vegetative and bloom stages, and use it as a recipe you adjust rather than follow rigidly. Ornamentals often do better with slightly lower EC than the maximum chart values, especially in warm, enclosed spaces where evaporation concentrates nutrients quickly.
If your tap water contains chloramine (common in many municipal supplies since 2000), aeration alone won't remove it. You'll need a chemical neutralizer like ascorbic acid (vitamin C), sodium metabisulfite (Campden tablets used in home brewing), or activated carbon filtration. Free chlorine, by contrast, dissipates with 24 hours of aeration in an open bucket.
Light, temperature, and getting the photoperiod right
Growing indoors means you control the sun, which is both a superpower and a responsibility. Most ornamental flowers used in cutting gardens want a Daily Light Integral (DLI) of at least 10 to 12 mol/m²/day during active growth. To put that in practical terms: running a grow light delivering 174 µmol/m²/s (measured at canopy height) for 16 hours gives you a DLI of approximately 10 mol/m²/day. If you're on a 12-hour photoperiod, you'd need around 231 µmol/m²/s to achieve the same DLI.
Snapdragons are long-day plants, meaning they flower faster when photoperiods exceed 14 to 16 hours. If you're struggling to get them to bloom, extending your light period to 16 hours often triggers the transition within a week or two. See Using Flowering Times and Leaf Numbers to Model Photoperiod Sensitivity in Antirrhinum majus, Journal article (NCBI/PMC) for experimental evidence on photoperiod manipulation and night‑interruption lighting to accelerate flowering in long‑day ornamentals Using Flowering Times and Leaf Numbers to Model Photoperiod Sensitivity in Antirrhinum majus — Journal article (NCBI/PMC). A low-intensity night-interruption light at the midpoint of the dark period can be even more efficient than extending the photoperiod continuously. Marigolds are day-neutral (they'll flower regardless of photoperiod once mature), making them forgiving under almost any lighting schedule.
For temperature, most cutting-garden flowers prefer 60 to 75°F (15 to 24°C) during the day with a slight drop at night. Keeping reservoir temperature below 72°F (22°C) is important for DWC systems since warmer water holds less dissolved oxygen and creates conditions where root pathogens thrive.
Supporting climbing flowers
Climbing ornamentals like sweet peas and climbing nasturtiums can absolutely be grown soilless. In a coco or ebb-and-flow setup, install a trellis netting or bamboo frame above the grow tray and train stems upward from week two. The roots in soilless media are often shallower than ground-planted climbers, so make sure containers are heavy enough (or secured) to resist the weight of a mature climbing plant. For detailed trellising and training techniques, see our guide on how to grow climbing flowers. In a tent, attach trellis net to the frame and let the plant fill it naturally.
Daily care and troubleshooting
Daily and weekly routine
- Check reservoir water level daily and top off with plain pH-adjusted water (not nutrient solution) to avoid EC creep from evaporation.
- Test and adjust pH every day for the first two weeks, then every other day once you know your system's drift rate.
- Test EC two to three times per week; do a full reservoir change every 7 to 14 days rather than just topping off indefinitely.
- Inspect roots visually once a week (shine a torch into the bucket or lift a net pot). Healthy roots are white to cream and firm. Brown, slimy roots indicate root rot.
- Check for pests (fungus gnats, aphids, spider mites, thrips) by examining the underside of leaves weekly.
- Wipe down reservoir walls during solution changes to prevent algae and biofilm buildup.
Common problems and fixes
| Problem | Likely cause | Fix |
|---|---|---|
| Yellow leaves (lower leaves first) | Nitrogen deficiency (EC too low, or N depleted late in reservoir life) | Change reservoir, increase nutrient strength to target EC; check pH is not locking out N |
| Purple leaf undersides | Phosphorus deficiency (often a pH lockout issue) | Check pH is below 6.5; increase phosphorus in bloom formula |
| Brown, slimy roots | Root rot (Pythium) from warm water or low oxygen | Lower reservoir temp below 72°F, increase aeration, treat with beneficial bacteria (Bacillus subtilis products) or dilute hydrogen peroxide (3ml of 3% H2O2 per litre as a short-term flush) |
| Slow or no germination | Temperature too low, media too wet or too dry, old seed | Check germination temp for your species; seeds should be moist but media not waterlogged |
| Leggy seedlings (stretching) | Insufficient light intensity or DLI too low | Lower lights or increase intensity; target minimum 100 µmol/m²/s at seedling canopy |
| White crusty deposits on media or pot edges | Nutrient salt buildup (EC in medium too high) | Flush with plain pH 6.0 water (2–3x container volume), then resume normal feeding |
| Aphid or thrips infestation | Carried in on clothing, cuttings, or through vents | Isolate affected plants; use insecticidal soap spray or neem oil solution on foliage (avoid roots and reservoir) |
Harvesting flowers and timing blooms
For cutting flowers, harvest stems when buds are just starting to open (showing color but not fully unfurled). This is the stage that gives the longest vase life. Cut in the early morning or evening when stems are fully hydrated. Plunge cut ends immediately into a bucket of clean water. Soilless-grown flowers often have excellent stem strength and length because nutrient delivery is consistent throughout the plant's life.
From seed or rooted cutting to first bloom, typical timelines under indoor conditions with 14 to 16 hours of light are: marigolds 45 to 55 days; snapdragons 80 to 100 days; sweet peas 60 to 90 days; zinnias 50 to 65 days. These are faster than outdoor averages because you control every variable. If your snapdragons are stalling before bloom, check both photoperiod (extend to 16 hours) and phosphorus levels in your nutrient solution.
Best flowers to grow soilless: variety recommendations
Not every flower type is equally easy soilless. Here's what I've had consistent success with, and a few honest notes on the trickier ones.
| Flower | Recommended system | Notes | Approximate seed-to-bloom (indoors, 16h light) |
|---|---|---|---|
| Marigold (African, French) | DWC, coco pots, ebb-and-flow | Reliable, fast, very forgiving with pH drift. Great first soilless flower. | 45–55 days |
| Snapdragon | DWC, coco pots, NFT | Long-day plant; extend photoperiod to 16h. Excellent cut flower stem length. | 80–100 days |
| Zinnia | Ebb-and-flow, coco pots | Loves warmth (above 70°F); susceptible to powdery mildew in high humidity. Space plants well. | 50–65 days |
| Sweet pea | Coco pots, ebb-and-flow with trellis | Prefers cool temps (55–65°F); needs support from week 2. Fragrance is spectacular. | 60–90 days |
| Poppy (annual, Shirley types) | Coco pots, media beds | Prefers cooler temps and slightly lower EC (~1.2–1.6). Sensitive to transplanting; direct sow into final container. | 60–80 days |
| Wildflower mixes | Coco pots, ebb-and-flow | Variable results by species; best treated as a mix of annuals with similar nutrient and light needs. Thin aggressively. | 50–90 days (varies) |
| Dahlia (from cuttings) | Coco pots, ebb-and-flow | Not from seed for true-to-type; root tip cuttings in aeroponic cloner. High nutrient demand at bloom. | 60–90 days from rooted cutting |
| Paperwhite narcissus (bulb) | Water-over-pebbles container | No nutrients needed. Shortest setup time of any option. Blooms in 4–6 weeks from bulb placement. | 28–45 days from placement |
Poppies deserve a special mention because they're a staple flower on this site and they behave differently soilless than most. They dislike root disturbance intensely, so always sow them directly into the final coco container rather than trying to transplant from a rockwool plug. Keep EC on the lower side and give them cooler temperatures (ideally 55 to 65°F) for germination. The payoff is spectacular, papery blooms that photograph beautifully and are absolutely achievable without outdoor soil.
What to try next
Once you've had success with a basic soilless setup, the natural next step is experimenting with propagation methods beyond seeds. Growing flowers without seeds entirely through cuttings, divisions, and bulb forcing opens up a completely different range of varieties and timelines. If you're drawn back to soil-based growing alongside your soilless experiments, exploring how compost-rich growing media compares for flower performance, or understanding the specific challenges and opportunities of clay soil, can round out your skills considerably. And if you're thinking about scaling up outdoors, raised beds sit in an interesting middle ground between conventional garden soil and fully controlled soilless systems.
The biggest thing I want you to take away from this guide is that growing flowers soilless is genuinely achievable from day one. You will almost certainly have a reservoir that drifts pH, a seedling that stretches toward a light that's too far away, or a cutting that takes three weeks when you expected one. That's not failure, that's just the system teaching you what it needs. Start small, keep a log, and celebrate the first bloom you cut from a plant that never touched garden soil. It feels just as good as any flower from the ground.
FAQ
What does “growing flowers without soil” include and how do the main soilless systems differ?
“Without soil” (soilless culture) covers hydroponics (DWC/raft, NFT, ebb-and-flow, media/drip), aeroponics (roots suspended and misted), and aquaponics (recirculating fish + plants). Key differences: DWC: roots submerged in oxygenated nutrient solution; easy and low-cost for hobbyists. NFT: thin film of solution flows past roots—good for small-rooted annuals. Ebb-and-flow: media trays flood/drain on a timer—versatile for plugs and bulbs. Aeroponics: high‑oxygen misting—fast rooting and propagation but higher cost/complexity. Aquaponics: integrates fish waste as nutrient source—requires fish care and water balancing. Choose by space, budget, and whether you want propagation-only (cloner) or full flowering production.
Which soilless method is best for a beginner home gardener who wants a cutting garden of marigolds, snapdragons and poppies?
For beginners growing cutting-garden annuals: Start with DWC rafts (small tote + air pump) or an ebb-and-flow setup using inert media (coco or perlite). Why: low cost, simple reservoirs, forgiving control of nutrients, easy expansion. Use small rockwool or coco plugs for seedlings, then transfer to rafts or media. Move to NFT or aeroponics later if you want higher density or faster propagation.
What are the measurable nutrient, pH and EC targets I should use for ornamental flowers?
General targets (species-dependent): pH: 5.5–6.5 (aim 5.8–6.2 for most ornamentals). EC/TDS: seedlings 0.6–1.0 mS/cm; vegetative 1.0–1.8 mS/cm; pre-flower/flowering 1.2–2.5 mS/cm. Use a two- or three-part commercial hydroponic fertilizer and follow manufacturer feed charts; measure EC and pH daily/each reservoir change. Test source water first (EC/TDS, hardness) and adjust mixes accordingly. Keep records of ppm (if using ppm): 500–1400 ppm roughly corresponds to the EC ranges above depending on meter.
Step-by-step: how do I grow flowers from seed in soilless media (rockwool or coco)?
1) Test and prepare water (dechlorinate if needed) and pre-soak rockwool/coco to recommended pH (rockwool ≈ pH 5.5 soak). 2) Sow seeds into sterile plugs/cubes at species depth and keep in a humidity dome. 3) Maintain stable temp per species (most flower seeds 65–75°F / 18–24°C) and keep medium evenly moist (not waterlogged). 4) Use a weak nutrient solution for seedlings (0.6–0.8 mS/cm). 5) Provide light: 12–16 hours of 200–300 µmol·m⁻²·s⁻¹ (or a DLI ≈ 8–12 mol·m⁻²·d⁻¹ depending on species). 6) Harden seedlings by gradually reducing humidity and increasing airflow before transplanting to the production system (rafts, NFT, or media). 7) Transplant when true leaves appear and roots exit the plug.
How do I propagate flowers without seeds (cuttings, bulbs, tubers) in soilless systems?
Cuttings (soft-stem): 1) Take 3–6" healthy tip cuttings. 2) Optional: dip in rooting hormone (IBA powder/gel per label). 3) Place in an aeroponic cloner or rockwool/coco plugs under high humidity (65–85%) and warm root-zone (72–77°F / 22–25°C). 4) Use frequent short mist cycles or automated humidity domes. 5) Expect rooting in ~5–14 days for many annuals. Bulbs/tubers: force paperwhites/hyacinths in gravel or pebbles with water level below bulb base—many bulbs need a chilling period first (check species). Tubers like dahlias root in coco or hydro media; keep moist and provide light when shoots emerge.
What equipment and materials will I need for the common soilless setups (checklist and approximate cost ranges)?
Essentials by system: DWC/raft: reservoir tote, net pots, raft/float, air pump + airline, air stones, nutrient feed — cost: $50–250 DIY. NFT: channels, submersible pump, fittings, reservoir, support — cost: $100–400. Ebb-and-flow: grow tray, reservoir, timed submersible pump, drain/flood fittings, media (coco/perlite) — cost: $100–350. Aeroponic cloner: cloner unit, timer, mist nozzles, reservoir, water pump/pressurized system — cost: $150–600. Aquaponics: tank, biofilter/plant beds, pump, plumbing — cost: $300+. Shared items: pH meter, EC/TDS meter, thermometer, lights (LEDs for indoor), dechlorination method or RO filter, sterile plugs/media, seeds/cuttings, trellises/supports. Start small, buy reliable meters—these pay back in fewer crop failures.
Next Articles
How to Grow Climbing Flowers: Complete Guide for Gardeners
How to grow climbing flowers: step-by-step planting, varieties, supports, soil depth, container sizes & troubleshooting.
Can You Grow Flowers in Compost? How to Do It Right
Yes. Learn how to grow flowers in compost with proven mix ratios, timing, and fixes for weeds, wet soil, and burn.
Can You Grow Flowers in a Raised Bed For Cutting
Yes, you can grow cut flowers in a raised bed: soil, spacing, drainage, plant choices, timing, care, and harvest tips.